
How to Add a Spanish accent in Microsoft Word | Guide [2024]
Microsoft Word is an effective tool for efficiently and rapidly creating documents. It allows you to change the pronunciation or meaning of letters by adding accent marks, which are symbols that are positioned above or below characters. Foreign languages like French, Spanish, and German often use them.
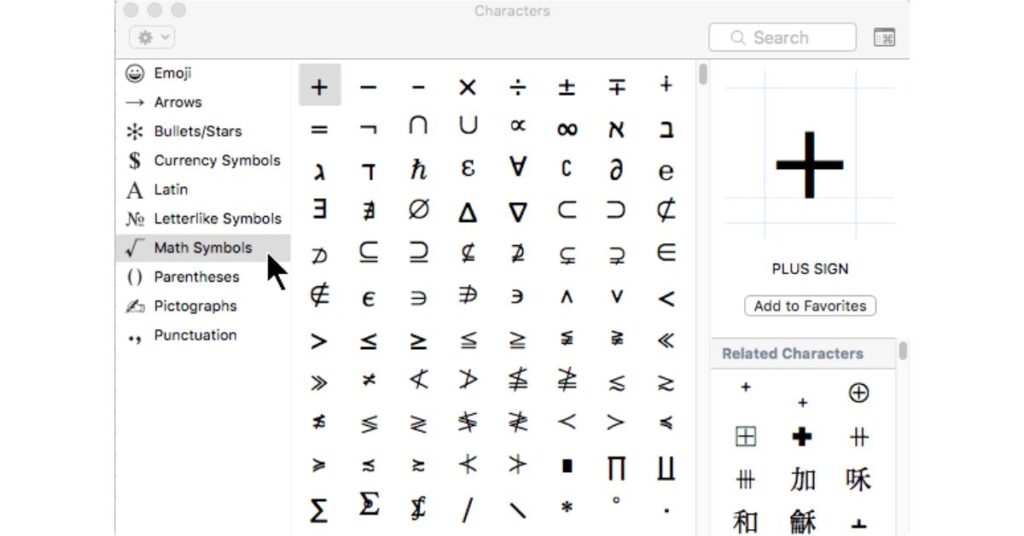
To add Spanish accents in Word, Select the “Insert” tab. Next, choose “Symbol” and “More Symbols“; a window containing characters and symbols will open. To select the preferred accent mark, use the drop-down choices. To include it in your document, click “Insert.”
This post will provide you with helpful hints and step-by-step directions on how to add Spanish accents To Word documents. Adding Spanish accent marks to Microsoft Word is simple. Here are mainly 3 methods to Add Spanish Accents In Word Documents. Follow the methods below.
Method 1: Using Insert Symbol To Add Spanish Accents In Word Documents
- Click on the “Insert” tab. Usually, it is located on the toolbar of your Word document.
- Decide on the accent mark’s location, either inside a word or above a letter.
- Click on the word or letter. The cursor will be at the proper location as a result.
- Return to the ‘Insert Symbol‘ function. Select the accent mark that you want, such as circumflex, acute, or grave.
- It should now display your accent mark. Verify again that it appears accurate. Accent marks may be positioned differently in different software. If necessary, review the documentation for your software. The way accent marks appear can vary depending on the font or language settings used. If needed, make these changes.
- Select “Symbol” from the “Insert” menu.
- Click “Insert” after selecting the accent mark from the list.
- After choosing an accent mark from the list, press “Insert.” Your text will now include the selected accent mark. Here’s how to do it: Go through the list by scrolling. Examine every choice. Select the accent mark of your choice. Click after highlighting it. Press “Insert.” It is simple to locate.
- Above that particular letter, place the accent mark.
Review the content you have edited. Verify the appearance of the accent mark.
Note: The number of accent marks in certain fonts varies. Make sure the font you’re using supports the one you want by checking it again.
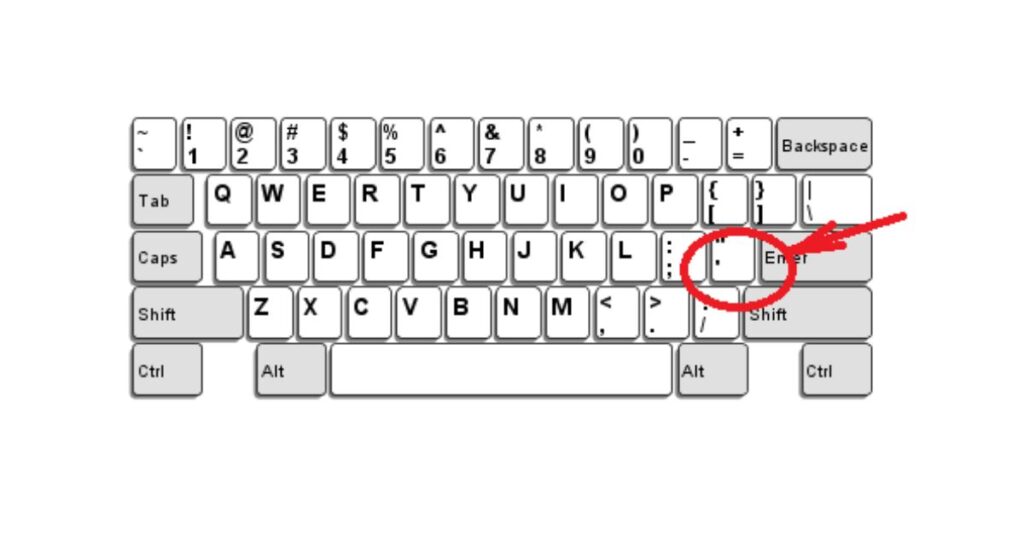
Expert Advice: I love keyboard shortcuts! Acquire the knowledge of shortcuts to add accents. Writing will flow more naturally and save time. To quickly add accent marks, use keyboard shortcuts. To add an accent mark to the letter, hold down the Ctrl key, press ', and then type the desired letter (e.g., Ctrl +'+ e for é).
Method 2: Using Keyboard Shortcuts To Add Spanish Accents In Word Documents
Keep in mind that not all letters have possibilities for accent when using keyboard shortcuts. Please refer to the user manual or internet resources for further details on accent marks. In Microsoft Word, create accent marks with ease by following these three easy steps:
- Using your keyboard, press and hold the Ctrl key.
- Once you have the apostrophe key (‘) pressed, hold down Ctrl.
- After letting go of both keys, enter the letter you wish to highlight.
Use these steps to add Spanish accents in Microsoft Word:
- Hold down the Ctrl key.
- Press the accent key (e.g., {) once while holding down Ctrl.
- After letting go of both keys, enter the letter you wish to highlight.
Typing accented characters may require some practice, so if you need assistance, check online or in the user manual for your device. Take note that keyboard shortcut options differ across platforms.
Read the tutorial to learn how to add a Spanish accent to Google Docs.
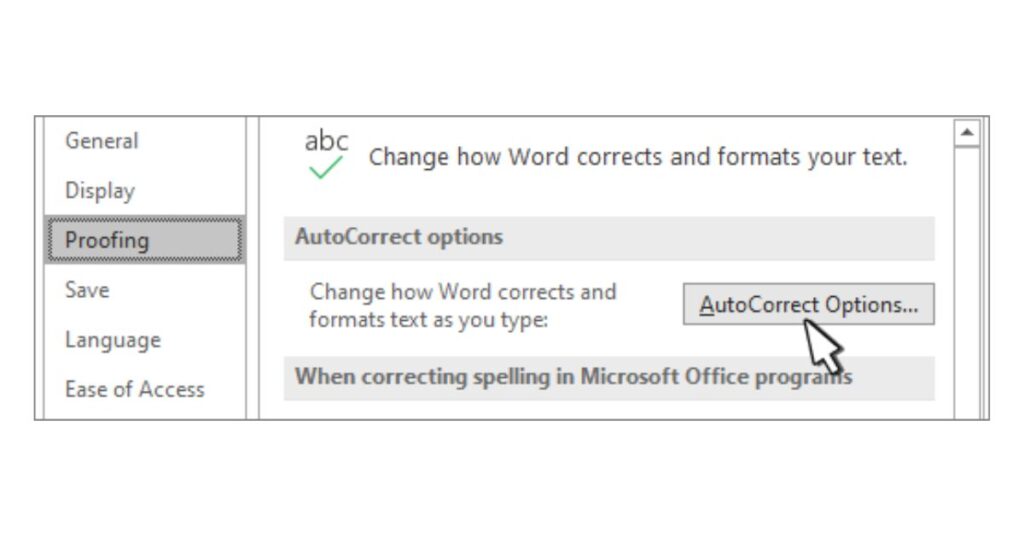
Method 3: Using AutoCorrect To Add Spanish Accents In Word
Microsoft Word offers a quick way to add accent marks by using the AutoCorrect tool. Take these actions:
- Click the “File” tab and choose “Options.”
- Select “AutoCorrect Options” after selecting “Proofing” in the Word Options dialogue box.
- Locate the “Replace text as you type” section under the “AutoCorrect” menu.
Pro Tip: For quicker access, customize the AutoCorrect feature by adding accent marks that you use regularly.
When writing in a language that uses accents or diacritical marks, this is incredibly helpful. Your text will appear professional and well-organized.
To modify or deactivate the feature, select “Options” under the “File” tab, then “Proofing.” After selecting “AutoCorrect Options,” make the necessary changes.
Make use of Word’s AutoCorrect now to type quickly and effortlessly with precise accent marks!
Are you ready to showcase your typing expertise? Enter the Word-ly universe and become a keyboard ninja by mastering those accent marks!
Have a Word doc you want to edit in Google Docs? No problem, here’s how.
Tips for Using Accent Marks in Microsoft Word
Insert mode? Turn it on! Just select the “Insert” tab from the menu at the top. Choose “Symbol” from the drop-down option after that. A window with a number of symbols will appear. Find the symbol that matches the accent mark or special character you want. When you click on it, the item will be added to your document where the pointer is.
Here are a few more pointers:
- Learn the shortcut keys on the keyboard for common accent marks. For example, Ctrl+’ (apostrophe) plus the letter to indicate an acute accent.
- To add autocorrect entries for your regular accent marks, go to Word’s settings.
- Certain fonts have more characters and accent marks than others. Take a look at them!
Your Microsoft Word documents will seem professional and accurate with accent marks and special characters if you follow these suggestions.
Learn More Tutorial of MS Word Below:
Conclusion
We have now completed this tutorial! You now know how to use Microsoft Word to add accent marks easily. Follow the instructions in the earlier sections. However, there are additional suggestions to enhance your experience.
![How To Get rid of Blue Paragraph Symbols in Word | Guide [2024]](https://techforgen.com/wp-content/uploads/2024/02/How-To-Get-rid-of-Blue-Paragraph-Symbols-in-Word-768x402.jpg)
![How to convert a Word doc into a Google Doc? | Easy Guide [2024]](https://techforgen.com/wp-content/uploads/2024/02/convert-a-Word-doc-into-a-Google-Doc-768x402.jpg)
![Elevate Your Writing: 11 Powerful Google Docs Formatting Features [2024]](https://techforgen.com/wp-content/uploads/2024/02/Google-Docs-Formatting-Features-768x402.jpg)
![how to add Spanish accents in Google Docs | Tutorial [2024]](https://techforgen.com/wp-content/uploads/2024/02/add-Spanish-accents-in-Google-Docs-768x402.jpg)
![How to Split Word Document In Half | Guide [2024]](https://techforgen.com/wp-content/uploads/2024/01/How-to-Split-Word-Document-In-Half-768x402.jpg)
![How To Anonymize Comments in Word | Complete Guide [2024]](https://techforgen.com/wp-content/uploads/2024/01/How-To-Anonymize-Comments-in-Word-768x402.jpg)