How To Remove Grey Highlight In Microsoft Word | Guide [2024]
The grey highlight might be irritating when formatting a document in Microsoft Word. Do you want to know how to remove grey highlight in Word? Here are some ideas!
There are several ways to get rid of Microsoft Word’s light grey highlight. Click the “Highlight” button in the Home tab’s Font section after selecting the highlighted text. This will remove the text you have chosen to highlight.
Alternatively, the Clear Formatting tool can be applied. In the Font section of the Home tab, choose the text that has the grey highlight applied to it, then click the arrow next to the “Clear Formatting” button. After that, select “Clear All Formatting” to remove the grey highlight.
If none of these tactics work, consider altering your document’s theme. Navigate to the Design tab and choose an alternative theme from the list of choices. Changing the theme could resolve formatting errors or undesired highlights that some themes occasionally create.
What is a grey highlight in Microsoft Word?
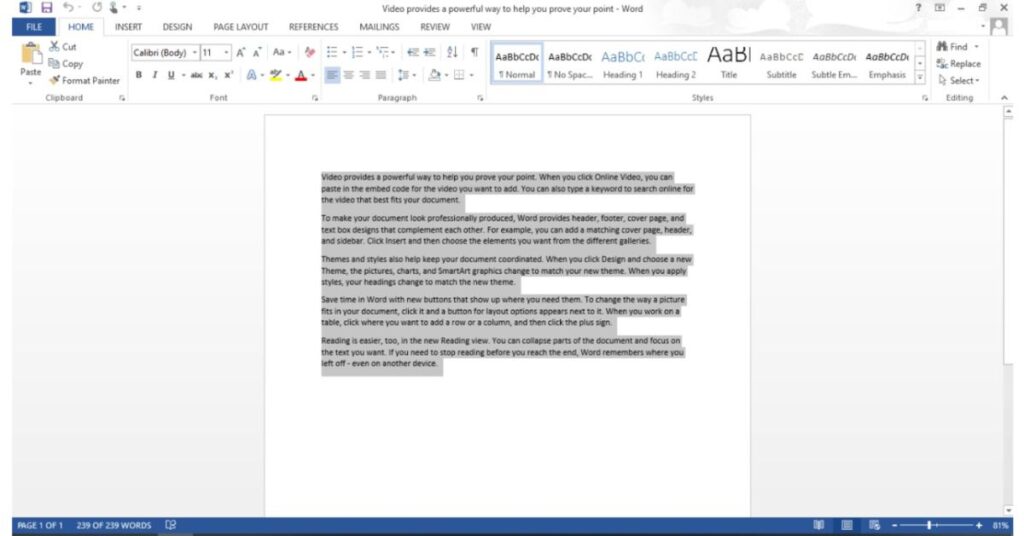
The light grey highlight is a useful tool in Microsoft Word that allows users to highlight text or areas. It’s a subtle method of highlighting significant information without distracting from the document.
First, select the text or section from which you want to remove the light grey highlight. Navigate to the “Home” tab located at the top of the application window. Locate the “Text Highlight Color” icon, which resembles a highlighter pen.
Several color selections will be available in a dropdown menu. Select “No Color” to get rid of the grey highlight. This option removes all highlighting from the section or text.
Removing the grey highlight won’t cause your text to disappear or change. All that’s lost is the formatting functionality. Content does not change.
Knowing how to remove the light grey highlight is helpful for anyone working with documents. Following these instructions, you can remove the grey highlight while maintaining the necessary content.
Interesting fact: Microsoft Word considered adding different colors for text highlighting in its early phases of development. However, user comments indicated that a paler grey tone was preferable. This option was included to provide more versatility. These insights help us understand the development process of our technology and tools.
how to remove grey highlight in Word
- Open a document in Microsoft Word.
- Click and drag the cursor over to pick the text with a grey highlight.
- To choose more than one text section, hold down the Ctrl key and click on each one.
- To select all of the text in the document, press Ctrl+A.
- You may remove the grey highlight once it’s selected.
Both little and vast sections of your page can be handled with this tactic.
A little tip: Shift + arrow keys can be used to enlarge the selection when you double-click a word to pick it.
Let’s proceed to remove the grey highlight now!
how to remove gray highlight using the “Highlight” feature
- Highlight the text that’s greyed out.
- Select the “Text Highlight Color” button (icon: marker and downward-pointing arrow) from the “Home” ribbon.
- From the dropdown option, select “No Fill.”
Remember that removing the grey highlight will also remove any additional highlights applied to the text.
Digital tools are fantastic because they make difficult tasks so much easier! Removing a grey highlight in the past required deleting it by hand or making additional formatting changes. We can now easily organize our documents because of “Highlight.”
Have a Word doc you want to edit in Google Docs? No problem, here’s how.
How to Remove the grey highlight using the “No Color” option
- Drag and drop the pointer to pick the text that is highlighted.
- Select the “Home” tab located at the top of the display.
- Locate the “Font” group and select the button with an arrow next to “Text Highlight Color.”
- Select “No Color” from the menu dropdown.
- The highlight in grey will disappear!
This technique won’t interfere with other styles or formatting. To give your work an upscale look, remove any unnecessary highlighting. Choose “No Color” for a clean and minimalist look.
To safely keep your work and find it later without losing any data or formatting, save your edits in Microsoft Word appropriately. Select “Save As” from the menu, pick a place on your computer, and then click “Save” after selecting the “File” tab. Alternatively, save using the shortcut keys “Ctrl + S.” Press “Alt + F4” or click the “X” button in the upper right corner of the document to close it.
Regularly storing up your documents is also advised. Utilize cloud storage services or store a copy of your file on an external drive. Turning on the AutoSave option may lower the chance of losing crucial edits by having your changes automatically saved at certain times. Go to “File”> “Options”> “Save” and check the box next to “Autosave OneDrive and SharePoint Online files by default” to activate autosaving. Keep in mind that older versions of Word could not support AutoSave and that it requires an active internet connection.
You can ensure that your Microsoft Word documents are safely kept and readily available at all times by following these instructions.
Helpful instructions on using highlights in Microsoft Word
Editing documents in Microsoft Word can be made more accessible by strategically using highlights. The following advice will assist you:
Make smart use of the Highlight tool. To make crucial information easy to find, highlight important portions or parts.
Change the highlight colors. To increase visibility and meet your needs, experiment with different colors. To highlight text, right-click on it, choose “Highlight,” then choose a color from a list.
Excess highlights can be easily removed. Right-click on a single highlight and choose “Remove Highlight” to remove it. For multiple highlights, select the text, choose the “Home” tab, click the arrow next to the highlighter icon, and select “No Color.”
Make use of the Find function. Use the Find tool (Ctrl+F) to swiftly look for particular highlighted parts in long documents with many highlights. Time is saved, and navigating through big files is made simple.
Additionally, many highlights can make a document appear disorganized and difficult to read, so strive to strike a balance.
Learn More Tutorial of MS Word Below:
In summary
The grey highlight can be removed in Microsoft Word to change. Throughout, we discussed how to do this together. Let’s conclude now.
We looked at how to get rid of Word’s grey highlight. You now understand how to remove that color. All you have to do is follow our guidelines to seem attractive and professional.
Some additional advice was not covered. You can change the color or remove all highlighting when you remove the grey highlight. You now have control over the text’s appearance.
![How to Add a Spanish accent in Microsoft Word | Guide [2024]](https://techforgen.com/wp-content/uploads/2024/01/How-To-Add-Spanish-Accents-In-Word-768x402.jpg)
![How To Anonymize Comments in Word | Complete Guide [2024]](https://techforgen.com/wp-content/uploads/2024/01/How-To-Anonymize-Comments-in-Word-768x402.jpg)
![how to add Spanish accents in Google Docs | Tutorial [2024]](https://techforgen.com/wp-content/uploads/2024/02/add-Spanish-accents-in-Google-Docs-768x402.jpg)
![How to convert a Word doc into a Google Doc? | Easy Guide [2024]](https://techforgen.com/wp-content/uploads/2024/02/convert-a-Word-doc-into-a-Google-Doc-768x402.jpg)
![How To Get rid of Blue Paragraph Symbols in Word | Guide [2024]](https://techforgen.com/wp-content/uploads/2024/02/How-To-Get-rid-of-Blue-Paragraph-Symbols-in-Word-768x402.jpg)
![Elevate Your Writing: 11 Powerful Google Docs Formatting Features [2024]](https://techforgen.com/wp-content/uploads/2024/02/Google-Docs-Formatting-Features-768x402.jpg)